Microsoft provides various security solutions for Word documents, allowing you to safeguard your files and ensure their protection.
In this guide, I will walk you through some of the easiest methods by MLSDev - software development services to secure your Microsoft Word documents. Here's how:
1. Make a Microsoft Word document read-only
By making your Word document read-only, you can prevent others from changing its content. To do this, follow these steps:
- Open the Word document.
- Click on File Menu and then click on "Info"
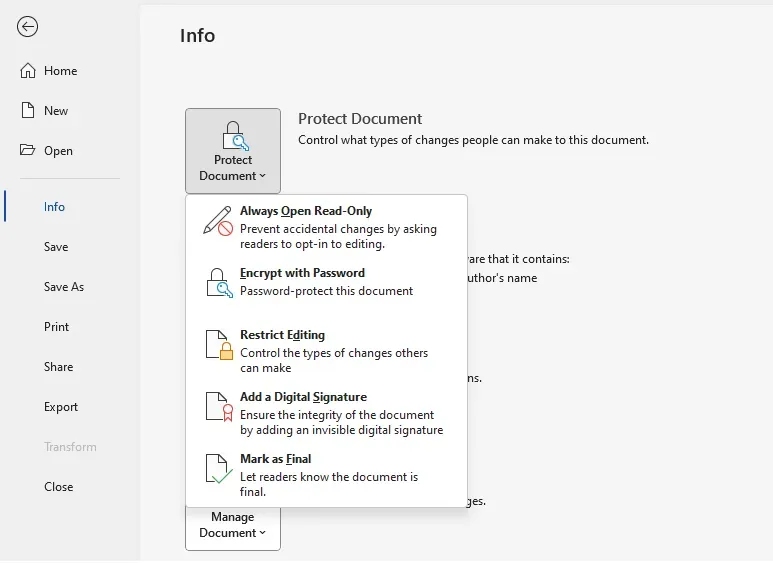
- Select "Protect Document" and then choose "Always Open Read Only."


2. Apply a password to your Microsoft Word document
A password to your Word document adds an extra layer of security by requiring a password to open or modify the document. Here's how you can do it:
- Open the Word document.
- Click on the "File" tab in the menu bar.
- Select "Protect Document" and then choose "Encrypt with Password"
- In the dialog box that appears, enter a password and click "OK."
- Confirm the password by entering it again and click "OK."
- Save the document to apply for password protection.

3. Restrict editing of a Microsoft Word document
If you want to allow others to view the content but limit their editing ability, you can apply editing restrictions to your Word document. Follow these steps:
- Open the Word document.
- Click on the "Review" tab in the menu bar.
- Select "Restrict Editing"
- In the pane on the right side, check the box that says "Allow only this type of editing in the document."
- Choose the editing restrictions you want to apply, such as "Tracked Changes" or "Comments," or customize the limits further.
- Optionally, you can set a password to restrict editing.
- Click "Yes, Start Enforcing Protection" and enter a desired password.
- Save the document to apply the editing restrictions.
4. Add a digital signature to a Microsoft Word document
A digital signature adds an extra layer of authenticity and integrity to your Word documents, assuring recipients that the file has not been altered and originates from a trusted source. It allows recipients to verify that the document was not tampered with and came from a trusted source. Here's how you can add a digital signature:
- Click on the "File" tab in the menu bar of the Word document.
- Select "Protect Document" and then "Add a Digital Signature."
- Follow the prompts to choose or create a digital signature, such as using a certificate or creating a new one, and save the result.
Congratulations, you have just done it!
5. Mark a Microsoft Word document as final
Indicate that the document is the final version and discourage further editing. It doesn't provide strict security but acts as a visual indicator. To mark a document as final:
- Click the "File" tab in the menu bar as in previous points.
- Select "Protect Document" and then choose "Mark as Final"
- A message will appear stating that the document will be marked as final and saved. Click "OK" to proceed.

The document will be marked as final, and a banner will be displayed across the top, indicating that it is read-only and final. Users have to click on the Edit Anyway button to edit the document.
By leveraging these built-in Word features correctly, you can effectively safeguard sensitive or confidential data in your documents. These methods can help you secure your Microsoft Word documents and control your content's access, editing, and authenticity. Remember to use strong passwords and keep them confidential to ensure maximum security.